Thursday, January 30, 2014

Shelf support and storage!

  1. Find antique TV stand and refinish it.
  2. Build bed frame.
  3. Build matching night stands.
  4. Refinish dining room table.
  5. Refinish bedroom furniture to match bed and night stands.
  6. Build computer desk for D.Soup.
  7. Refinish wing back chair.
  8. Build floating shelves.
  9. Build outdoor planters.
  10. Install cabinets with clothes folding space into laundry room, with cat door.
  11. Paint L.Soup's bedroom.
  12. Paint foyer.
  13. Sew pillow for L.Soup's bedroom.


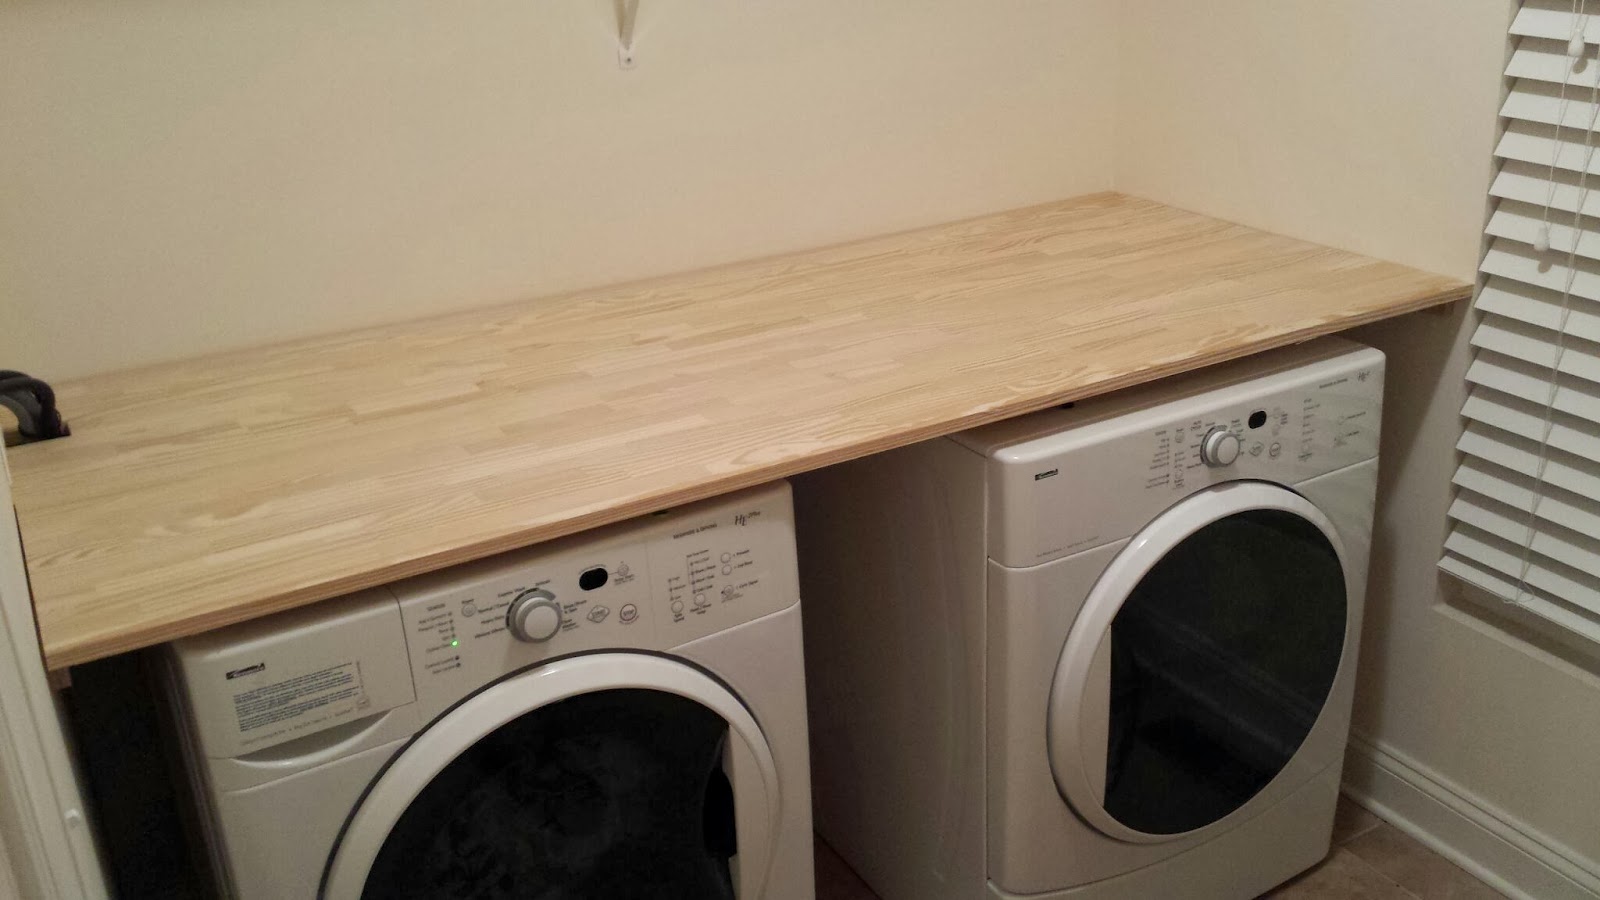
After getting the shelves put into the laundry room, we knew we needed to get a support underneath the larger shelf between the washer and dryer, because it wasn't completely stable and the boards would start sagging otherwise.  Originally, it was just going to be a bracket type of support, but as we continued to think about it, we realized there was enough space there for some storage as well.

Of course I love storage, so I was all in for that plan.

Once we decided on that, D.Soup couldn't think about anything else.  So a few nights later after L.Soup was in bed, we mosied down to the basement and got to work.  The plan came from D.Soup's brain, and we're not master pattern makers or anything, so it's not a finished piece by any means.   But it will be perfect for between the two machines.

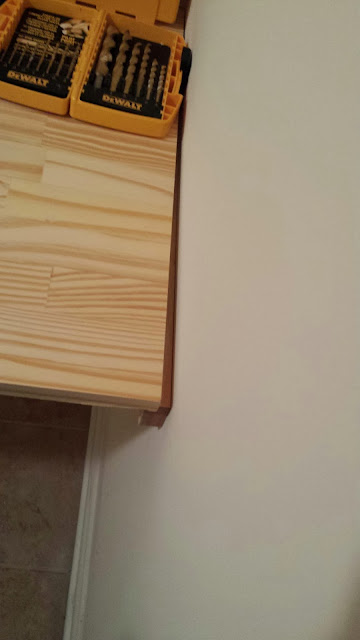
We knew the height to the bottom of the shelf was 37", and the space between the two machines was 13".  We had some spare 2x4's hanging around that would be the perfect skeleton...

Testing out the Kreg Jig.


We wanted to do a trial run on the Kreg Jig before my bedside table building session, and I also didn't want to be able to see any screws in the finished product.  After a few rounds of listening to D.Soup grumble about not understanding what he was supposed to be doing, I found a "how to use the Kreg Jig" instruction blog post.  Things seemed to go much more smoothly after that.

One side
Box Shape
Leveling out the last piece

We didn't have any plywood, so we picked some up the next day when we took our trip to the hardware store.  Unfortunately, D.Soup didn't account for the width of the plywood when measuring for size, so there is no space to put outside walls up that we had intended on doing.  I'm planning on getting baskets to use for storing things anyway, so the walls probably aren't completely necessary.

All done!
The more I look at it, the more I think we should have put the front 2x4 in the middle the other way, to allow that bottom shelf to have a little more space in the front.  It's easily fixable, but we'll see if it actually happens.

A few days later, we decided to put the cat door in, and finish up all the goals for the laundry room right now.  I sat on the floor in the hallway with my hands over L.Soup's ears while D.Soup cut a hole in the bottom of the door.  She's basically terrified of anything that makes a loud noise (except herself).  So whenever possible I try to let her experience loud noises from the protection of my (or her father's) arms.  It seems to be helping her get more and more brave around things she shouldn't be scared of.  Like a screwdriver.  Or the vacuum.

Bonus!


I'm so happy things are getting done around here.

Tuesday, January 28, 2014

Building with friends

  1. Find antique TV stand and refinish it.
  2. Build bed frame.
  3. Build matching night stands.
  4. Refinish dining room table.
  5. Refinish bedroom furniture to match bed and night stands.
  6. Build computer desk for D.Soup.
  7. Refinish wing back chair.
  8. Build floating shelves.
  9. Build outdoor planters.
  10. Install cabinets with clothes folding space into laundry room, with cat door.
  11. Paint L.Soup's bedroom.
  12. Paint foyer.
  13. Sew pillow for L.Soup's bedroom.

Our bedroom has basically been the most ignored room in our house since we moved in.  There are so many plans that I have for this room, but we just haven't made the time to work on them.  It's a beautiful sized room, but we have filled it with things that are not exactly screaming bedroom sanctuary.

Originally, I had a whole description of the room written here.  But it was confusing and I kept forgetting to include the pictures that would help it make more sense, so I'll do a before and after soon.

But, until then....

We need night stands.  Badly.  I can't have the baby sleeping in the co-sleeper with my jewelry and the monitor for L.Soup and my phone all hanging out in there with her.  I also need the room to start looking more like a place that adults sleep, and less like a college dorm room.

My friend and I made a deal that if she helps me build these, I'll help her build an entertainment center in a few months when it's warmer.  So the plans were made, and a few weekends ago it was happening...

When mom takes too long putting the cart together, dad decides where we ride.

D. Soup and I made our way to the hardware store on Saturday, and Sunday was the day!  They were finally getting done!  She got to my house around 10, and we hung out for a little while and then got to work.  We got through the cutting part pretty quickly and efficiently.  This was the part I was more worried about, but apparently my friend was 100% confident in our cutting abilities.  We actually did much better than I expected, considering D. Soup never lets me cut anything.

All our wood cut up
The next step was assembly.  I was far more confident on this part, because I know how to use a drill and hammer.  We hit a few snags when instructions weren't completely clear, or when we discovered that our assistant (my friends mom) had not provided us with all the cuts we needed, so we had to steal a few pieces from the pile for the second night stand.  Not a huge deal, but it was confusing for a little while.

We also used the Kreg Jig to connect most of the pieces together, which took a bit of a learning curve.  But we got it figured out eventually.  It's actually really awesome!

Halfway there!
The other issue we ran into was the pine 2x2's we were working with were warped.  The nice wood in the lumber section at the hardware store was only available in 3 foot sections for 2x2's, and I was NOT paying $5.50 for a 3 foot section, especially when I needed 13 of them.  No thanks.

Luckily D.Soup found 8 foot pine 2x2's in another section, but they aren't as nice as the other materials.  Not a huge deal because I can easily sand them down to look nice.  The biggest issue was the warping, like I said.  It caused us a little trouble when putting the front bottom piece on.  It actually pulled the screw out of the board directly under the drawer.  We had to cut another board for that section that was a little longer and replace it so that it stayed attached.  That was frustrating.

For full disclosure:  We also had a slight mishap with the top boards.  We tried clamping all 3 pieces together and then screwing them together, and that caused the top piece to curve in the center.  I think I'm going to take it back apart and try again so that its more even across the top.

But in all honesty, you can hardly tell anything is wrong with it unless you are very seriously inspecting it.

Finished (unfinished) product!
I'm so happy with how it turned out.  Everyone was super impressed (and surprised... thanks a lot) at how good of a job we did, considering we don't use power tools very often.  Unfortunately we only got one done, because we had a few minor delays and we had to stop for eating and for babies and things of that nature.

The other one is in the works still, it's been a busy few weeks.  I'm hoping that it will get done soon so we will have a matching set.


I love mine already.

Tuesday, January 21, 2014

Another shelf for the laundry room!

We are trying to plan our evenings so we efficiently get things done throughout the week.  Instead of making a huge list for the week and trying to do too many things at one time, we make a short list each day of things we would like to accomplish before heading to bed.  For example, Wednesday's list was: 
  1. wash 1 load of  laundry
  2. put away all clean laundry
  3. take measurements in bedroom
  4. measure space for counter in laundry room
  5. bring laundry basket from landing upstairs
Laundry is pretty much a constant on the list, and we never seem to get around to putting it all away.  Like on Wednesday.  We ended up working later than we expected, so by the time we got home and ate, it was too late to put any of L.Soup's clothes away before putting her to bed.  Which was unfortunate, considering most of the laundry that hasn't been put away at the moment belongs to her.  I think there are currently 2.5 baskets sitting around our house dedicated to her stuff.

So obviously #2 on the list didn't happen.  But we did get one full load of our laundry done and put away, along with another load that was waiting to be put away.  (#2 got moved over to Thursday's list, and we actually got all of L.Soup's clothes dealt with before bed time.  So that's progress!)

While I was reading to L.Soup, I heard D.Soup doing some measuring.  So I figured he was getting #4 done.  #3 was my job, since I'm measuring for the nightstands my friend and I are building on Sunday (!!).  As I was putting L.Soup into her crib, I heard the saw running.  So did my girl.  So that jacked up our whole night time routine, since we had to talk about daddy being NOISY a million times before she would settle down.

So we over achieved on one step of our to do list, which took away from a few other parts.  But it means that the big shelf in the laundry room is done!  We added a leg to the other shelf, but its covered in stuff and ugly so I didn't take a picture of it.  For this shelf, we used two longer sections of ready to stain panels similar to this.  We only needed about 77 inches of actual board, but the options were 96 or 72, so we had to go for the longer pieces and cut them down.  Unfortunately, as we discovered last time, the walls are not square, so it called for some special measuring that I did not get to be a part of, since someone didn't want to wait until I was done with the bedtime routine.  No big deal, he did a spectacular job without me and didn't even have to go back for a second round of cutting.

He had to notch out a section for the tubes that run to the back of the washing machine, you can see them on the left hand side of the picture below.  A little stain and a little molding around the edges and these shelves are done!  I can't stain while I'm pregnant, but D.Soup said he's all over it, so it can actually get done soon!  Woo!

It's so beautiful.
I have been using Country Save liquid detergent for the last two years.  I really like it, and the fact that my clothes don't have any specific scent to them anymore.  D.Soup decided he wanted something that was specifically HE, so we switched over to the powdered version to give it a try.  Which means I now get to display it in a pretty glass jar on top of the new counter!

My new laundry detergent container!
It also means that I shouldn't have to buy laundry detergent for another 4 years.  We've been using the same 4 bottles I purchased in March 2012, and we're almost done the last bottle.  That's including some leakage we had due to one of the bottles having a crack in the bottom.

The powder came in another pack of 4, but each box is supposed to cover 160 loads of laundry.  Amazing.
 
To round things out, I also got a little trash can to stuff all the dryer lint into.  This is a step up for me considering before we were just piling it on top of the dryer until it got out of hand.  Which was frequently.
New little trash can for lint!
After taking these pictures, I emptied out a laundry basket and sat it on top.  There's still so much room!  I love it so much.

The laundry room work is probably going to go on hiatus pretty soon, in lieu of the attic stairs.  I'm going to try to get the curtains up while D.Soup is working on other things, so if that happens there will be another laundry room post.


I'm just happy to have this much done this quickly.

Thursday, January 16, 2014

Pillows!

I have a few pillows that I've been wanting to put back into my living room.  I could have easily used the current cases, which matched perfectly in the living room at our old house, until I had time to redo the whole living room to make everything match...

Unfortunately, they all look like this:

Damn puppy teeth!
Every corner on every.single.pillow.  Adult Calli is lucky that Puppy Calli was so cute.

So, a few months ago, I bought fabric to make some new pillow cases.  My vision for the new living room is blue accents, which will match the shades of blue I hope to paint the furniture sometime in the (far distant) future.  These are two of the fabrics I ended up choosing:
I originally picked out three fabrics, because I was absolutely sure that I had 6 pillows.  But apparently that was WRONG, because I can only find 4 pillows total.  I might just leave it at that, and use the other fabric for something else.  I'm going to let the pillows settle in over the next few days before I decide.

I asked for a yard of each fabric, and I'm not sure if the cuts were off or if they shrank that much when I put the fabric through the drier, but both sheets were much shorter than I expected them to be.  Unfortunately, the pillows were also slightly larger than I expected them to be too.  Pillow inserts available for purchase at the fabric store are approximately 16" square.  These inserts came with the cases, and ended up being 17.5" square.  So I was cutting it pretty close (no pun intended) when I was measuring everything out.

I followed the measurement guidelines from MADE on how to sew a slipcover for a pillow (second half of the video).
Front
Back.
Overall I'm very happy with how they turned out.  If you want to get into sewing, pillows are a good place to start.  Four straight lines is the easiest thing I've ever sewn.

I've noticed a few times that you can see the insert along the opening on the back of the pillow.  So apparently some of the cases are a little snug.  I'm sure it will work itself out.
Not sure what's going on with the weird coloring here...
I obviously need to stop taking pictures with my cell phone.


The fronts sure look pretty though.

Wednesday, January 15, 2014

Adult outing time

D.Soup and I don't take many chances to have just "us time" outside the house.  We spend a few hours together every night after L.Soup goes to bed either working on some house stuff, or watching shows that we both like. 

D.Soup enters the weekly raffle through his company for tickets to the Capitals games, and we lucked out when he scored a pair for Tuesdays game against the Sharks.  We scheduled an extended day with my parents and made plans to leave straight from work to head to DC.


Originally my mom offered to just have L.Soup sleep at their house, but that plan was changed when I admitted I wasn't emotionally ready to not see her at all between Tuesday morning drop off and Wednesday afternoon pickup.  She will be 2 in April, and I have never been away from her for more than a work day.  I didn't want my first night away from her to be one where I was coming home to sleep in my own bed.

We got to DC around 4, and decided just to eat at the Greene Turtle.  It's attached to the Verizon Center, and it was a little gross outside last night.  That, and I wasn't terribly hungry, so I didn't want to go somewhere nice and not actually eat anything.

We split two appetizers - the Mozzarella Caprese and Crab Dip.  After that I was full.  We sat for a little while and just enjoyed each others company, while also people watching.  Of course.

D.Soup decided he wanted to get some wings before we went in for the game.  So I took that opportunity to order something I've been craving for the last week or so.  ICE CREAM.  On top of a brownie which was a definite bonus in my book.  It was delicious.

I was surprised at the number of people that would look at me, and then look down at my belly.  I guess the hockey jersey was throwing them off.  I don't think it was that hard to tell that I am pregnant even through the larger than average shirt.  But apparently some people were having difficulty what exactly was going on under there.

There were some older men sitting behind us, and while two of them were obviously interested in the game, the other two were absolutely not.  They spent the second and third periods gossiping like two little school girls.  It took everything in my red haze filled pregnant brain not to turn around and tell them to shut the eff up.  I couldn't stop myself from loudly complaining to D.Soup about them though.  There's only so much I can do to contain the anger.  At the end of the second period, I actually heard one of the two of them say:
"wait, why are there 0's up on the time clock?"
"It's the end of the second period??  Already??"

Sweet Mary.  How do you miss an entire 20 minutes of game time?!

Anywho... The game was really good, but sadly the Caps ended up losing in the shootout.

We had a great time, AND I got to see my girl this morning when she woke up.  Double bonus.


Thanks again, mom and dad!!

Monday, January 13, 2014

All the crap that needs to get done

We have a LOT of things that needs to happen before the baby gets here.  Well, technically before the baby is ready to move out of the co-sleeper.  So that buys us a few more months.  Luckily.

The plan is to move L.Soup into what is currently the computer/craft room.  Preferably before we are ready to move the baby into the nursery.  That means we have to move all the of disastrous mess stuff from that room into the other spare room above the garage. 

I wish that we could just move her into that room, and not have to shift all the rooms around, but I'm worried that if one of us has to run out after L.Soup is already in bed for the night, the noise from the garage door opening is going to wake her up.  Its fairly loud when you're in that room and the garage door is moving.  So that idea got nixed.

THAT room is currently full of about 8 million baby clothes.  I wish I was exaggerating.  My dearest sister dumped gifted all of her kids clothes to us when they were done with them.  I've spent the last few months slowly going through the 22 trash bags that arrived at our house and organizing them into large storage boxes.  I'm almost done.  Once I found out we were having a girl, I focused more on finishing up that stuff so it was well organized and mixed with what I had from L.Soup.  The boy stuff has kind of been brushed to the side and I need to focus back on finishing that up.

Once all the clothes are actually organized, they need to be moved up to the attic.  At least all the boy stuff.  Some of the girl stuff can stay down and get put out in prep for our new girls arrival in April.  Before anything can go up into the attic, we need stairs to the attic.  The builder grade attic access (which is in our closet) is a joke.  Even if the floor of our closet wasn't covered in shoes (whoops) the hole is just big enough for an adult to shimmy through, there's absolutely no way any kind of storage box is fitting through it.

We are looking into something like this.  D.Soup still has to get up in the attic and make sure it's possible place everything where we want, but if so we will have ladder access in the hallway heading into the laundry room.

Let's recap:

  1. Cut gaping hole in ceiling.
  2. Replace gaping hole with attic stairs.
  3. Create flooring in attic.
  4. Finish organizing 8 million baby clothes.
  5. Move boxes of baby clothes into attic.
  6. Clean out room over garage completely.
  7. Move computer/craft room into newly cleaned out room.
  8. Create awesome new room for L.Soup.
  9. Move L.Soup into awesome new room.
  10. Move baby into nursery.
All before October (ish)?  With a 2 year old and a newborn.  Cake.

Ha.

So obviously, once the shelves are finished in the laundry room, that project is getting put on hold for a little while so we can focus on some of these steps.


Help.

Monday, January 6, 2014

My only Christmas craft

My in-laws (almost jokingly, I think) asked for a new mailbox for Christmas this year.  Something that represented them better than the falling apart mailbox that they currently have.  I thought about buying one already made for a little while, but decided I would try my hand at it instead.

D.Soup's family loves anything Disney, so I knew that was the direction I would be going in.  I found some cute images that expanded nicely (they are about 7 inches tall I think) and got everything ready in Silhouette Studio.  I purchased some black vinyl (how did I not already have black!?) and some clear printable vinyl for the characters.

I had purchased red and orange acrylic craft paint about a month ago for a project that never ended up happening with L.Soup.  I guess that will be a present for everyone next Christmas.  At least we have a whole year to get it done now, yes? 

The only other things I needed were a mailbox that I had D.Soup pick up at the hardware store one day, and some sponges which I stole from my mom's crafting supplies.

Here's the finished product (PLEASE ignore the disgustingness of my craft room, ugh):

Super fancy star because I didn't ask if they were okay with their name being on here
Other side
Front.  Same deal.
After everything was done drying, I had D.Soup put a few coats of clear UV protectant polyurethane over it.  I was standing with him for about one second as he was spraying, and then had to run away.  I really appreciated his help because I never would have gotten that done.  That stuff is stinky!  And I'm not supposed to be around fumes like that, while I'm growing another person and all.  

Overall I'm super happy with how it turned out.  It didn't really take that much work.  I'm a little unsure about how the printable vinyl stuck to the mailbox.  There was one section on Mickey's arm that seemed to not stick as nicely as everything else.  D.Soup's mom asked when we were coming to install it, so I guess I'll check out that arm when we go over for that.  make sure it's up to standards and whatnot.

His mom was super excited about it.  She asked where we got it from.  Always a good thing for someone to think your work is professionally done. :)

I sent the pictures to my mom and she thought I should make and sell them.  And then I laughed, because who has time for that??? 


I'm trying to decide what I want on my mailbox.

Thursday, January 2, 2014

Next Project

  1. Find antique TV stand and refinish it.
  2. Build bed frame.
  3. Build matching night stands.
  4. Refinish dining room table.
  5. Refinish bedroom furniture to match bed and night stands.
  6. Build computer desk for D.Soup.
  7. Refinish wing back chair.
  8. Build floating shelves.
  9. Build outdoor planters.
  10. Install cabinets with clothes folding space into laundry room, with cat door.
  11. Paint L.Soup's bedroom.
  12. Paint foyer.
  13. Sew pillow for L.Soup's bedroom. 

First and most importantly:
Happy New Year!!


I'm so happy my energy, willpower and motivation are back!  I'm ready to get back to work on the house.  Especially now that the foyer is done! Woo!  I don't have to feel guilty starting a new project when that's still sitting around sadly.

D.Soup and I decided that for Christmas this year we would work on getting some of the stuff in the house dealt with, instead of buying each other presents.  We have a lot of plans for this house, and haven't made much time to get anything done (obviously, see list above). 

For the last our laundry room has been a wealth of unused space.  We threw the washer and dryer in there, along with any laundry and cleaning supplies would fit up on the single wire shelf that came pre-installed.  We also hid the cat's litter box in there.
Hate this mess.

Of course I waited until the work started to take pictures.


Gross

It's a mess.  There's litter all over the floor (gross).  I can hardly reach any of the stuff on the shelf.  There's no where to deal with the clothes once they are finished in the dryer, which means they end up piled up in our room until we deal with them.
 
Originally our plan was to purchase a ready to finish cabinet to put in the open space and hide the litter box inside, and a cat door for them to have access to it.  My only worry was that the prefabbed cabinets would be too small for the litter box that we have. 


As I was perusing the internet one day, I came across this.  I immediately knew that this would be such a better route for us, and sent it to D.Soup to look over.  Now the plan is to have two counter tops, one over the washer and dryer, and one in the opposite corner over the litter box.  That counter will get the curtain treatment, to hide what happens in the litter box from sight.  

The other change is that the laundry room door will be getting a cat door on it.  That way it can stay closed all the time.  L.Soup will be moving to the room closest to the laundry room within the year, and I don't want any late night laundry running to keep her awake.  Having the ability to close the door completely should help with the noise problem.

Another addition to this room will be wall cabinets!  I hate wire shelves, especially ones that are way to high for my short self to reach without excessive stretching.  A set will go over the washer and dryer, and another over the cat box.  Storage everywhere!

I found this great stencil that I also have big plans for. I ordered it, along with a stencil brush and can't wait for it to arrive!  

We got started putting the braces up for the two shelves while we were off work after New Years.  We discovered L.Soup is NOT a fan of the drill.  She threw an absolute fit every time it started up.  That was fun.  So far this is our progress:
First board up!  Another one runs down the wall on the right, but I forgot to take a picture.
After we got the two boards up for this corner, D.Soup grabbed the actual shelf piece, so we could see how it looked.  He sat it on the brace, and said "Well, good news and bad news..."

Good news, is it fits... Bad news, our room isn't square!  What the heck!  So it looks like this:
Rude.
We are going to get some trim and cover that mess up...Then we have to figure out what we're using for a leg on the side that's not butted up against a wall.  That's on my to do list.

We came across the same issue with the other walls too.  Above the front of the washer and dryer, the distance between the walls measures 76.75", but in the corners it measures 76.25"!  That was fun for D.Soup, who cut the board you see below at 76.75" while in the basement.  He then had to run the stairs 4 times to get it cut the correct length.  He was planning on just cutting and eighth of an inch each time, then wised up after the third trip down two flights of stairs and measured the distance between the walls in the corner.
 
Boards up around the washer and dryer!
Next step is to cut the boards for the top so they fit around the tubing you see on the left hand side.  We also now have to take into consideration the change in distance and make sure to cut the boards on a slight angle so we don't have another huge gap.

I bought a little flip top trash can to go on top of the counter over the washer and dryer for dryer lint, which is much better than it just sitting on top of the dryer like it normally does (as you can see in a few of the pictures).  I also bought a glass canister to put my new powdered laundry detergent in.  I've never used powdered before, but I like the brand (I've used the liquid for the last 2 years) and it should last FOREVER, since I bought this.  So now I have a pretty place to store it.

Obviously I'm pretty excited about this getting done so quickly.

The cabinet part of this deal might not happen as fast, but I'm okay with that.  We decided to use these plans from Ana White and build our own cabinets:
We'll need 2 of each of the wall cabinets, and 1 base cabinet to squeeze in between the washer and dryer.  To purchase the cabinets that we need, it would cost us well over $400.  If we build our own, it will cost us around $200 according to my calculations.  Making them ourselves also allows us to tweak the sizes slightly so they fit perfectly in the spaces.  Also, I'm completely okay with it taking a little longer to save that much money.


Heck, I'm still sleeping on a mattress on the floor.
So obviously I don't mind waiting,
and not paying out the wazoo for something.